Run the command below,
bitnami@debian:~$ python -c 'from django.core.management.utils import get_random_secret_key; print(get_random_secret_key())'
Category: Django
How to add SSH Key to GitHub Account (application Bitnami Django)
・Creat an SSH Key,
bitnami@debian:~$ ssh-keygen -t rsa -b 4096 -C "email@example.com"Substutute email@example.com with your email address.
・Press Enter to accept the default file location (/home/bitnami/.ssh/id_rsa).
・Enter the secure passphrase (password –> same as the GitHub account).
・Enter the command to display the contents of the generated public key,
bitnami@debian:~$ cat /home/bitnami/.ssh/id_rsa.pub
・Add this public key to your GitHub Account.
Log into your GitHub Account.
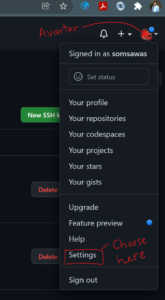
・Click your avartar and choose settings.
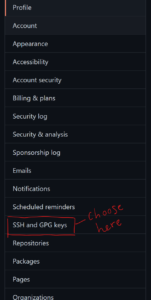
・Select SSH and GPG Keys
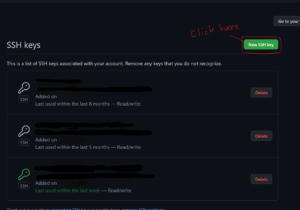
・Click New SSH Key button to create new SSH Key
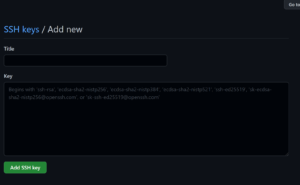
・Enter the title in the Title filed and your public key from the above process in the Key field
Ref:
How to Add SSH Keys to Your GitHub Account
Now, you can process the commit your work.
bitnami@debian:~$ git status

bitnami@debian:~$ git add -A

bitnami@debian:~$ git commit -m "Any comment..."

bitnami@debian:~$ git push -u origin master
Deploy Django Project (Production) on Bitnami Django Stack (VM VirtualBox)
First, identify the Bitnami Installation Type by running the command below,
binami@debian:~$ test ! -f "/opt/bitnami/common/bin/openssl" && echo "Approach A: Using system packages." || echo "Approach B: Self-contained installation."
Ref:
1) Deploy a Django project
Install Emacs Editor on Debian / Ubuntu Linux
How to Install and Launch emacs Editor on Debian / Ubuntu Linux
Install Emacs with APT,
bitnami@debian:~$ sudo apt-get install emacs
Ref:
HARLEY HAHN’S Emacs Field Guide
VMware vs. Virtual Box
VMware vs. Virtual Box: Comprehensive Comparison
Some conclusion:
- If you need a free virtualization solution for a desktop, you can select VirtualBox.
- If you need to have a free virtualization solution for running VMs on a server, select VirtualBox or VMware ESXi Free Edition.
- If you need an ultimate solution for desktop with extended 3D graphics support and a wide list of settings, select VMware Workstation (or VMware Fusion for Mac computers).
- If you need a free virtualization solution that only needs to run VMware VMs on desktop with basic options, you can select VMware Player.
- If you need maximum integration between a VMware desktop solution and a VMware vSphere (vCenter server, ESXi hosts), select VMware Workstation or VMware Fusion Pro. You can use VMware Workstation or Fusion Pro for connecting to vCenter Server or ESXi host remotely, and can manage virtual machines residing on these resources. VMware provides a free VMware vCenter Converter for converting VMs of the Workstation format to VMs of the ESXi format (and vice versa).
- If you have an old computer with a processor that does not support hardware virtualization technologies, select VirtualBox, which provides software virtualization.
- If you need the ultimate enterprise-grade solution for deploying multiple servers, running a high number of VMs, using clustering features, etc., select VMware vSphere based on ESXi servers with vCenter.
More about virtualization solutions, compare VirtualBox with Hyper-V.
Adding a new SSH key to your GitHub account
Adding a new SSH key to your GitHub account
Before adding a new SSH key to your GitHub account, you should have:
Mount VirtualBox shared folder
การจะทำ Shared folder ของทางฝั่ง Host PC (Windows; the OS of the physical computer on which Oracle VM VirtualBox was installed) ให้เห็นที่ Guest OS (Debian GNU/Linux; OS ที่รันบน VirtualBox)
ดูที่นี่ –> here
With the VM powered off, click on Settings (on the VM) -> Shared Folders. Here, add a folder, select the path browsing in your host file system and assign it a shared_name. You can select read-only or auto-mount if you wish. After that, press ok and start the virtual machine. When it is started, try the following command:
sudo mount -t vboxsf shared_name /mnt/
where shared_name was the name set in “Folder Name” label and /mnt/ is the mounting point in the guest system.
แต่ก่อนอื่นจะต้องทำการติดตั้ง VirtualBox Guest Additions ก่อน
โดยทำดังนี้ –> here
To install VirtualBox Guest Additions, follow these steps:
1) Stop the virtual machine.
2) Edit the virtual machine settings and from the “System” tab, add a new CD-ROM device to the machine.
3) Restart the virtual machine.
4) Check the current kernel version:
uname -a5) Install some needed dependencies as shown below. Remember to replace the VERSION placeholder with the kernel version from the previous command. packages with the proper kernel_version shown by the previous command:
sudo apt-get -y install dkms build-essential linux-headers-VERSION6) Restart the virtual machine:
sudo reboot7) From the virtual machine menu, select the “Devices -> CD/DVD Devices -> Choose a virtual CD/DVD disk file” option. Select the VBoxGuestAdditions.iso file. This action simulates inserting a CD-ROM that includes the tools.
The VBoxGuestAdditions.iso file is usually located in the /usr/share/virtualbox/ directory on Linux, in the C:\Program Files\Oracle\VirtualBox directory on Windows and the Contents/MacOS directory of the VirtualBox package on Mac OS X.8) Mount the CD-ROM and install the VirtualBox Guest Additions:
sudo mkdir /mnt/cdrom

sudo mount /dev/cdrom /mnt/cdrom

cd /mnt/cdrom

sudo sh ./VBoxLinuxAdditions.run --nox11
You can safely ignore the error below if it appears during the installation process:
  Installing the Window System drivers ...fail!

  (Could not find the X.Org or XFree86 Window System.)
Once the process is complete, check that the output resembles that shown below. If it does, the VirtualBox Guest Additions have been successfully installed.
  Verifying archive integrity... All good.

  Uncompressing VirtualBox 4.1.22 Guest Additions for Linux.........

  VirtualBox Guest Additions installer

  Removing existing VirtualBox DKMS kernel modules ...done.

  Removing existing VirtualBox non-DKMS kernel modules ...done.

  Building the VirtualBox Guest Additions kernel modules ...done.

  Doing non-kernel setup of the Guest Additions ...done.
Start Django project when using Bitnami Django Stack Environment
Follow this method…
1) Start the Bitnami Django Stack Environment console (run batch file: use_djangostack.bat in C:\Bitnami\djangostack-3.2-0)
2) Change directory to the Bitnami project directory (C:\Users\usrname\Bitnami Django Stack projects) and create a new directory (\mysite), which is the folder for Git repository root.
C:\Users\usrname\Bitnami Django Stack projects>mkdir mysite

C:\Users\usrname\Bitnami Django Stack projects>cd mysite

C:\Users\usrname\Bitnami Django Stack projects\mysite>
3) Create a new Django project called config with the following command. Don’t forget the period . at the end.
https://djangoforbeginners.com/initial-setup/
C:\Users\usrname\Bitnami Django Stack projects\mysite>django-admin startproject config .
By running django-admin startproject config . (with the period at the end), will installs in the current directory and has the directory structure:
C:\Users\usrname\Binami Django Stack projects\mysite--manage.py

                                                   |--config

                                                      |--__init__.py

                                                      |--asgi.py

                                                      |--settings.py

                                                      |--urls.py

                                                      |--wsgi.py
Ref:
Django from Full Stack Python
How to Switch to a Custom Django User Model Mid-Project