Category: Git
How to add SSH Key to GitHub Account (application Bitnami Django)
・Creat an SSH Key,
bitnami@debian:~$ ssh-keygen -t rsa -b 4096 -C "[email protected]"Substutute [email protected] with your email address.
・Press Enter to accept the default file location (/home/bitnami/.ssh/id_rsa).
・Enter the secure passphrase (password –> same as the GitHub account).
・Enter the command to display the contents of the generated public key,
bitnami@debian:~$ cat /home/bitnami/.ssh/id_rsa.pub
・Add this public key to your GitHub Account.
Log into your GitHub Account.
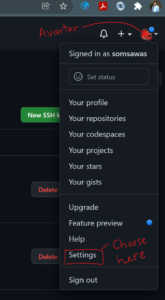
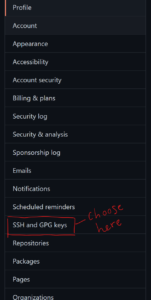
・Click your avartar and choose settings.
・Select SSH and GPG Keys
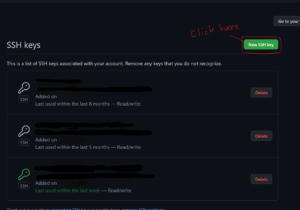
・Click New SSH Key button to create new SSH Key
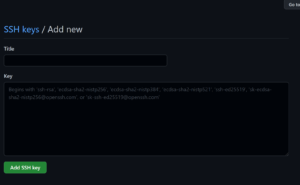
・Enter the title in the Title filed and your public key from the above process in the Key field
Ref:
How to Add SSH Keys to Your GitHub Account
Now, you can process the commit your work.
bitnami@debian:~$ git status

bitnami@debian:~$ git add -A

bitnami@debian:~$ git commit -m "Any comment..."

bitnami@debian:~$ git push -u origin master
Adding a new SSH key to your GitHub account
Adding a new SSH key to your GitHub account
Before adding a new SSH key to your GitHub account, you should have:
Git and GitHub (How to use git push command)
Git is a version control system. Using git to collaborate the work with other developers, track all your work via commits, and revert to any previous version of your code.
หลังจาก Install แล้ว ให้ทำการ setup(one-time system setup) เพื่อ config ชื่อ(name) และ e-mail address โดยใช้ command line console
C:\>git config --global user.name "Your Name"

C:\>git config --global user.email "[email protected]"
เราสามารถเปลี่ยน configs เหล่านี้โดยใช้คำสั่งชุดนี้แล้วใส่ name และ e-mail address ใหม่
หลังจาก install และ ทำการ config name และ e-mail address แล้ว ก็จะสู่ขั้นตอน initialize Git to the repository
ให้เข้าไปที่ folder (เช่น folder helloworld) ที่ต้องการทำ repository และ run command git init
C:\(helloworld)\>git init
และใช้คำสั่ง git status เพื่อเช็ค lists of changes from last Git commit
C:\(helloworld)\>git status
ขั้นตอนต่อไป ทำการ add all changes by using command add -A และ commit the changes along with the message (-m) describing what has changed
C:\(helloworld)\>git add -A

C:\(helloworld)\>git commit -m "initial commit"
GitHub is a remote repository of your work. It also allows for collaboration with other software developers. You can choose to private or public repositories of your work.
ก่อนอื่น ต้องทำการ sign up for free account on GitHub (สร้าง username) และทำการ “Create a new repository”
เมื่อทำการสร้าง repository online (บน GitHub) แล้ว เช่นตั้งชื่อว่า hello-world ขั้นตอนต่อไปคือ sync the local directory (C:\(helloworld)\) on your computer with the remote repository (hello-world) on the GitHub website
C:\(helloworld)\>git remote add origin https://github.com/username/hello-world.git
ขั้นตอนสุดท้ายคือ push our work (code) to GitHub (แต่ต้อง setup SSH Keys ก่อน ที่จะใช้ git push ไปยัง GitHub)
C:\(helloworld)\>git push -u origin master
Note: เราสามารถใช้ Git Bash เป็น command line console ได้ ซึ่ง Git Bash มาพร้อมกับตอนติดตั้ง Git
การ setup SSH Keys
Ref
เริ่มต้นด้วยการใช้ Git Bash console เราจะได้ command line console ที่มี dollar sign ($) เป็น command prompt
ใช้คำสั่ง $ pwd เพื่อเช็ค current directory โดยปกติจะเห็นว่าเราอยู่ที่ directory /c/Users/username
สร้าง SSH Key โดยใช้คำสั่ง ssh-keygen
$ ssh-keygen -t ed25519 -C "[email protected]"
This creates a new SSH key, using the provided email as a label.
เราจะเห็น folder .ssh ใน current directory (/c/Users/username)
และใน folder .ssh ก็จะมี files id_ed25519 กับ id_ed25519.pub
ให้ทำการ add the SSH key to your GitHub account
การใช้ git push command เพื่อ upload repository ของ folder งานของเราไปไว้ที่ GitHub
C:\(helloworld)\> git remote add origin https://github.com/username/hello-world.git

C:\(helloworld)\> git push -u origin master
Ref:
Git Handbook (?10 minute read)