Django, Htmx and Tailwind Todo Application
Github: https://github.com/SteinOveHelset/django-htmx-tailwind-todo.git
YouTube: Part1, Part2
Others:
Explain verbose_name and verbose_name_plural in Django
Excerpt from the above:
In this article, we explain verbose_name and verbose_name_plural in Django.
So both verbose_name and verbose_name_plural are ways of making objects human readable or converting to a point where they are human readable.
A notable place where verbose_name and verbose_name_plural can apply to is objects in a database table.
In Python, all rows of data in a database table are objects.
In Python, pretty much almost everything is an object, including strings, integers, and so on.
In this example, we deal with objects of a database table (i.e., the rows of data entered into the database table).
Let’s just go over an example, because this is probably the best way to learn this.
So let’s say we have the following code below to create a database table.
from django.db import models


class Child(models.Model):

    name= models.CharField(

        max_length=100,

        verbose_name="Child's First Name and Last Name"

    )

    weight= models.DecimalField(max_digits=3, decimal_places=2)


    def __str__(self):

        return self.name
We’ll now go over the code.
So, like any database table creation, we import models from django.db
We create a database table called Child.
In this Child database table, we have a name field and a weight field (the weight field is of type DecimalField and can have up to 3 digits and precision of 2 decimal places).
The name field is where we make use of the verbose_name attribute. What verbose_name does is it adds a label to the side of a database field. It works very much like label for forms in Django. verbose_name is pretty much the equivalent of the label attribute for forms. verbose_name is what is used to give labels to forms.
You would use verbose_name if you don’t want the default database field name (in this case, name) to be shown. Django automatically capitalizes a field name, so ‘Name’ would be displayed. But this could cause ambiguity. A person may not know it’s the full name we want. They may think just the first name or just the last name. Therefore, we can use verbose_name and explicity tell the user, ‘Child’s First Name and Last Name’. This cuts out any ambiguity that may possibly exist.
verbose_name, in my opinion, is a very appropriate name. The verbose_name specified is normally more verbose so that you can explicitly tell a user what to add. Instead of just ‘Name’ being displayed, we now display, ‘Child’s First Name and Last Name’.
So this is one of the uses of verbose_name.
It allows us to explicity state instructions next to a database table field.
We then define a __str__ method so that if we retrieve an object, the name is returned instead of just generic non-human readable text.
Now let’s go back to the same example we had before with the Child database table.
If you’re somewhat familiar with database tables in Django, you know that the table name should be declared to be a singular form, because in the admin page of Django, it ends with pluralizing the table name. This is because a table is really a representation of objects. So if you declare name such as Comment, it really is a collection of Comments (so Django automatically pluralizes it in the admin page once the database table is created and registered).
By default, Django adds a ‘s’ to a table name in the admin page.
However, this doesn’t always work. For example, if a database table called ‘Child’, the plural of ‘Child’ is really ‘Children’, not ‘Childs’.
If you create a database table called ‘Child’ and register it in the admin.py file and go to the admin page, you’ll see ‘Childs’.
So there is a way in Django, you can explicitly declare what the singular form of the database objects should be and what the plural form of the database objects should be. And this can be done by using verbose_name and verbose_name_plural attributes.
So, in the code below, we explicitly declare the singular form of each of the objects of the Child database table to be ‘Child’ and the plural form of the objects to be ‘Children’.
from django.db import models


class Child(models.Model):

    name= models.CharField(

        max_length=100,

        verbose_name="Child's First Name and Last Name"

    )

    weight= models.DecimalField(max_digits=3, decimal_places=2)


    class Meta:

        verbose_name = 'Child'

        verbose_name_plural = 'Children'


    def __str__(self):

        return self.name
So we have the same file as before, but just with a class Meta added.
What a class Meta is, if you’re familiar with HTML, meta is just data about something, a web page, or a database table. It doesn’t alter the function of the item, it just tells about the data. In HTML, the keywords and description content in the head tag is meta data. It just tells us about the page. In Django, we use meta data about a database table to tell Django things about the database table. In this example, we specify that the singular form of the object of the database table should be ‘Child’ and the plural form of the database table should be ‘Children’
And now you register the database table in admin.py using the line, admin.site.register(Child), (make sure you imported the database table from the models.py file into to the admin.py file), you will now see the plural form of the objects of the database table. And if you click in the database table, you will see the singular form.
And this is pretty good uses and good knowledge to know that you can use verbose_name and verbose_name_plural to specify meta data about a database table in Django.
Step-by-step from Enable the shared folder
uname -rvmhgfs-fuse /mnt/hgfs fuse defaults,allow_other 0 0Before you do that, you might want to check that things are setup correctly. Try running the following:
sudo mkdir -p /mnt/hgfs/

sudo /usr/bin/vmhgfs-fuse .host:/ /mnt/hgfs/ -o subtype=vmhgfs-fuse,allow_other
or
sudo /usr/bin/vmhgfs-fuse .host:/SharedFolderName /MountPoint -o subtype=vmhgfs-fuse,allow_other,nonempty
SharedFolderName: The name that is set in VMware (Option–>Shared Folder), e.g., projects
MountPoint: Mounting location assigned to the shared folder, e.g., opt/bitnami/projects
Ref: Mounting Shared Folders in a Linux Guest
Ref:
Approach A: Bitnami Installations Using System Packages
👆Identify whether the Bitnami stack uses native Linux system packages (Approach A),
or self-contained installation (Approach B) by running the command below:
bitnami@debian:~$ test ! -f "/opt/bitnami/common/bin/openssl" && echo "Approach A: Using system packages." || echo "Approach B: Self-contained installation."
To serve the application through the Apache web server with the mod_wsgi module,
follow the steps below.
Enable WSGI configuration for the Django application
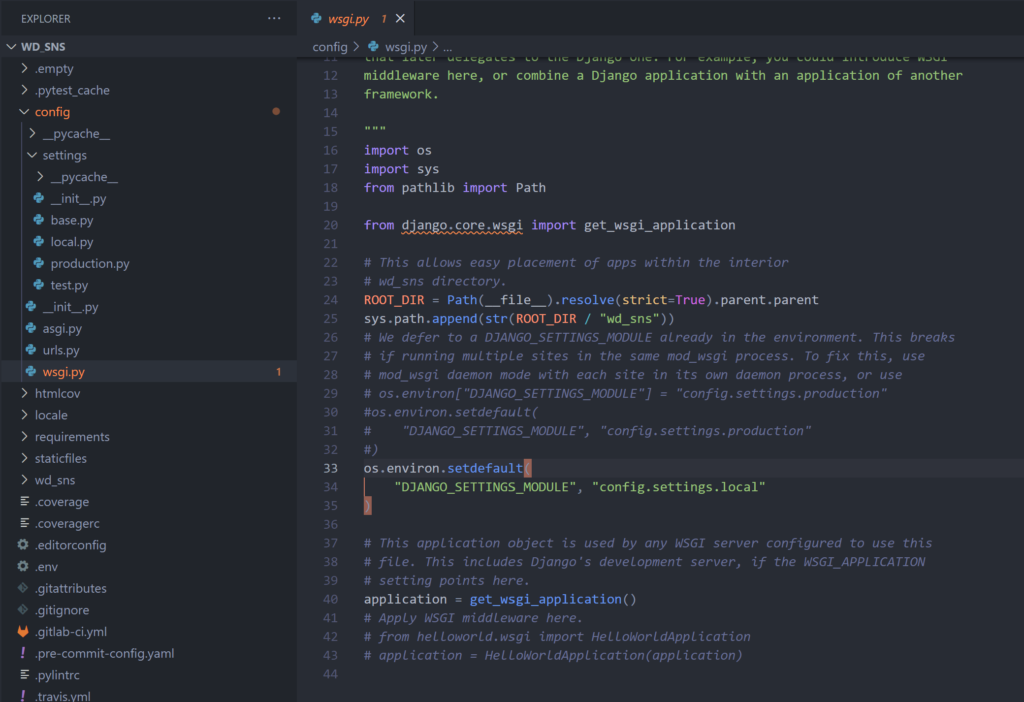
Ensure the Django project contains a wsgi.py file with contents similar to this:
import os

from django.core.wsgi import get_wsgi_application

os.environ.setdefault('DJANGO_SETTINGS_MODULE', 'PROJECT.settings')

application = get_wsgi_application()
Enable predefined virtual hosts for a Django project
The Bitnami installation comes with predefined HTTP and HTTPS virtual hosts for running Django projects
with the mod_wsgi module. To enable them, follow the steps below:
NOTE: These files assume that the Django project is named sample
and is located at /opt/bitnami/projects/sample.
If your Django project is named or located differently, edit the
files below and update the file paths accordingly.
bitnami@debian:~$ sudo cp /opt/bitnami/apache2/conf/vhosts/sample-vhost.conf.disabled /opt/bitnami/apache2/conf/vhosts/sample-vhost.conf

bitnami@debian:~$ sudo cp /opt/bitnami/apache2/conf/vhosts/sample-https-vhost.conf.disabled /opt/bitnami/apache2/conf/vhosts/sample-https-vhost.conf
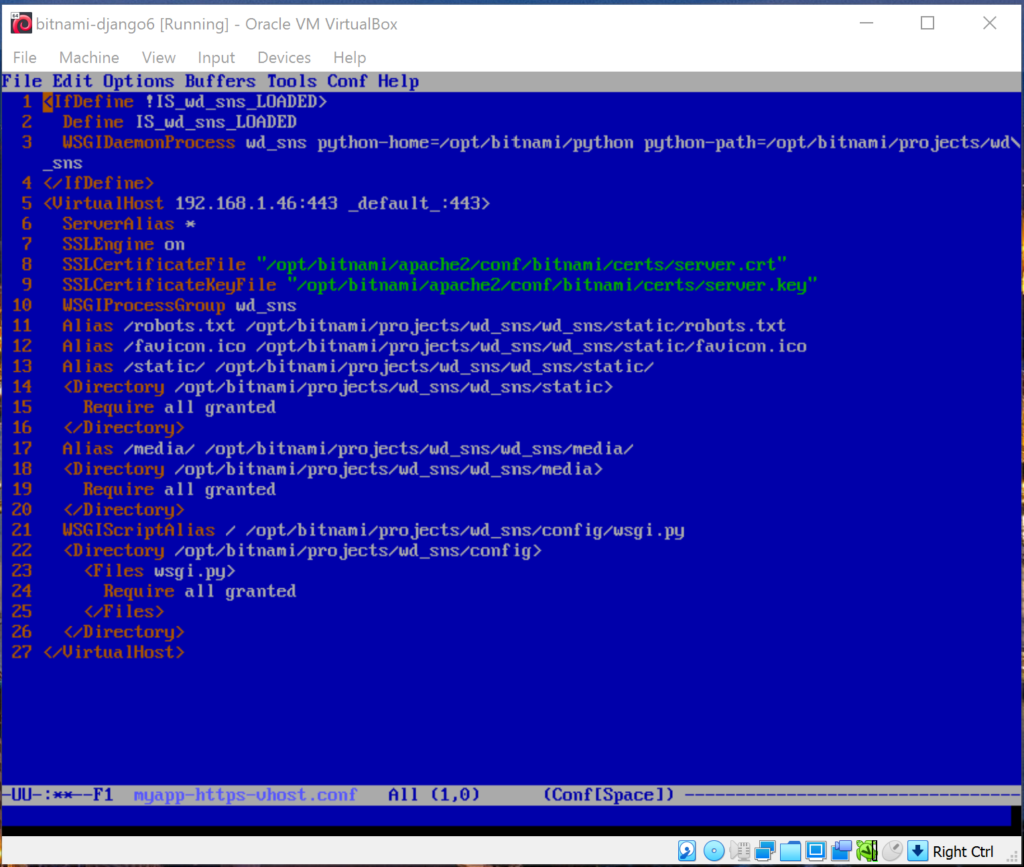

bitnami@debian:~$ sudo /opt/bitnami/ctlscript.sh restart apache
Ref:
Connect To The Virtual Machine From Another Host
VMware Workstation Player
VMware Workstation Player Documentation
VMware Workstation 16 Pro
Buy Online the License for VMware Workstation Pro –> Today Online bought! (199+13.93 = $212.93)
VMware Workstation (Compare Product)
Django Packaged By Bitnami For VMware Marketplace
How to share folders between Windows and Ubuntu using VMware Player
Manually Install VMware Tools on Linux
How to Install VMware Tools
✔Mounting VMware Shares from the Command Line on Linux VM
✔How to Install VMware Tools on Ubuntu/Debian VMware Virtual Machine
✔How to mount Windows shares in Mint Linux 18.3
Mounting Shared Folders in a Linux Guest
Mount VMware Shares on Linux VM:
bitnami@debian:~$ cd /opt/bitnami

bitnami@debian:/opt/bitnami$ sudo mkdir PROJECTS

bitnami@debian:/opt/bitnami$ sudo chmod 777 PROJECTS

bitnami@debian:/opt/bitnami$ cd

bitnami@debian:~$ sudo mount -t fuse.vmhgfs-fuse -o allow_other .host:/VM_DJPROJECTS /opt/bitnami/PROJECTS
If error happen, using this command,
bitnami@debian:~$ sudo vmhgfs-fuse -o nonempty -o allow_other .host:/VM_DJPROJECTS /opt/bitnami/PROJECTS
*VM_DJPROJECTS is the shared folder name in Host computer (Windows).
PROJECTS is the shared folder in Guest computer (Linux Debian).
Automatically Mount VMware Shares:
If you want the VMware Linux VM to automatically mount the VMware share on boot,
you have to add a new line to the /etc/fstab file.
bitnami@debian:~$ cd /etc

bitnami@debian:/etc$ sudo chmod 777 fstab

bitnami@debian:/etc$ emacs fstab
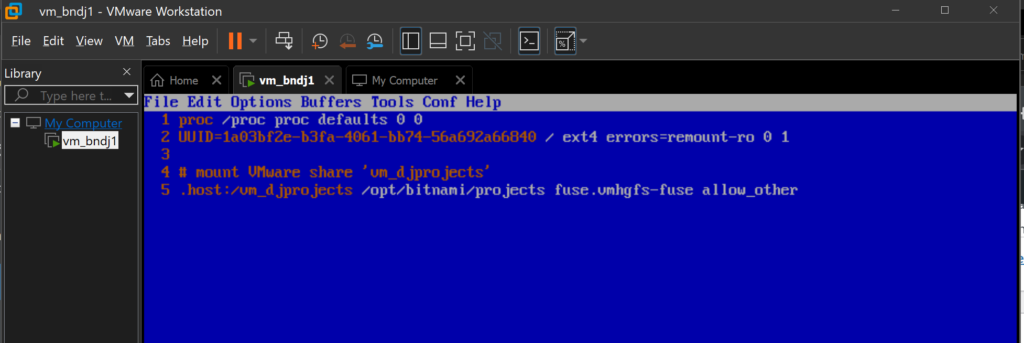
Using chmod command to change file permission back to original.
bitnami@debian:/etc$ sudo chmod 644 fstab

Then, reboot.
bitnami@debian:/etc$ sudo reboot
To show the DjDT (Django-debug-Toolbar), need DEBUG=True and IP of the request must be in the INTERNAL_IPS.
(https://django-debug-toolbar.readthedocs.io/en/latest/installation.html#internal-ips)